Friday night at our house is usually pizza night. Once in a while we order out but we usually make it. I get all the kiddos involved. Some like to spread the sauce, some put on pepperoni, and some cheese. Many hands make light work!
I use two large rectangular baking sheets and that feed our family of 10 with some leftovers for the next day.
If you are afraid of making your own bread dough, pizza dough, garlic sticks, etc. Fear no more! This recipe is adapted from Artisan Bread in Five Minutes A Day. I’ve made it an easy process.
Here are the ingredients:
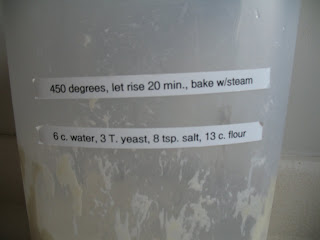
6 c. warm water
3 T yeast
8 tsp. salt
13 c. flour (I use all-purpose unbleached)
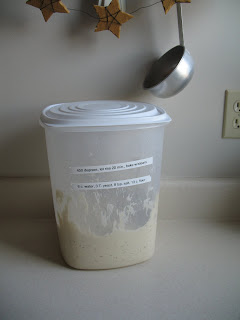
All you need is a large 10 quart container. Mix the yeast and salt in warm water with a spoon. (Not hot, because you’ll kill the yeast, but not cold because you want the water warm enough to activate the yeast. Think of it as warm enough for a baby’s bath.) Add in the flour all at once. Mix it around with a spoon or your hands. (Make sure you and your helpers wash hands and remove jewelry first!) Place the cover on top loosely and let it rise for about 2 hours. You can then either use it immediately after it’s risen or place the lid on tight and refrigerate it for up to 2 weeks. If it’s been stored in the fridge for a while then let it rise 20 minutes before baking.
If you’re going to bake it as bread right after the 2 hour rising process then preheat the oven to 450 degrees. The important part is to bake with steam. That means put a pie pan on the bottom rack with about 1/2 inch water in it. Be careful when opening up the oven, though…that steam likes to escape and it’s a bit hot! (I don’t use steam when baking pizza, though.)
This is the container we use..
This is the label that we have on it so we remember the directions…
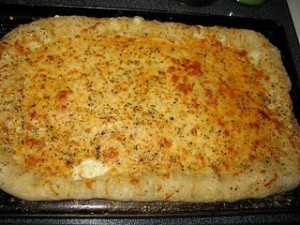
This recipe will make about 4-6 pizza crusts (thinner is better)…or various amounts of bread sticks, or rolls. The easiest bread we do is pat it out onto a greased cookie sheet and bake it for about 15 minutes until slightly golden on top. When it’s done we cut it up with a pizza cutter and serve with butter.
For garlic cheese bread we press dough into a pizza pan. Cut it in strips with the pizza cutter. Then we pour melted butter over the top. Sprinkle on garlic powder, basil, oregano, parmesan cheese, mozzarella, colby-jack and a little bit of cheddar. Bake for about 15 minutes. Or…use it for your pizza…see below!
Stuffed Crust Pizza
Dough (1/2 batch will do it for two large pizzas)
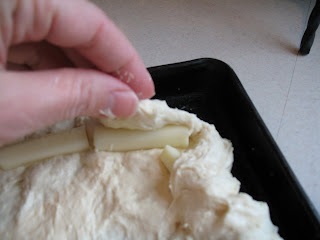
10 sticks mozzarella string cheese
1 1/2 cups pizza sauce or spaghetti sauce (the latter is cheaper and doesn’t taste any different)
4 oz. shredded colby-jack cheese
16 oz. mozzarella
pepperoni
Parmesan cheese (I used Parmesan/Romano blend)
Basil
Oregano
Garlic powder
(We usually add browned sausage, onions, green pepper, and black olives on one of the pizzas but we didn’t have those for the pic. since we were eating from the pantry last week.)
Spray the cookie sheets with non-stick spray. Put two large mounds of dough on the cookie sheets and pat out with greased hands. (If the dough is too wet and sticks to your hands even if they’re greased then you want to use floured hands to pat out the dough.) Make sure you make the edges of the dough touch the pans and be a little thick. Cut the string cheese in half and then in half lengthwise. Push them into the edges of the dough.
Once you’ve laid out all the string cheese start folding over the dough so it encases the cheese.
Spread out the pizza or spaghetti sauce. Try not to touch the seams where your dough encased the cheese or they may unroll and the cheese will melt out.
Sprinkle half the mozzarella on the cheese and then the colby jack. Then lay out the toppings.
Sprinkle the rest of the mozzarella. Sprinkle generously with Parmesan/Romano cheese (we use the kind in the can), garlic powder, oregano, and basil (there’s not a specific amount…it depends on what you like).
Bake in a preheated 400 degree oven for 15-20 minutes. Ovens vary, and if you are baking two pizzas you’ll need to rotate them.
– – –
Making pizza in the kitchen with my girls (ages 11, 9, 6, and 2) is a fun and productive process. If the meat that needs to be cooked is prepared ahead of time then younger children can pretty much make pizza on their own! I know my children love to set down to the table and hear a round of “Thank you’s” from the family when they have helped make a meal. It’s a great way to get them started in the kitchen. Start a pizza night tradition in your home!
– – –
Teaching our daughters homemaking skills takes patience. Often times it’s like waiting for dough to rise. You know you have all the right ingredients in the bowl (the skills you teach them) but you are patiently waiting for it to rise and be ready to be used in the bread pan (to click in their minds and hearts and be second-hand nature). “You shall teach them diligently to your children, and shall talk of them when you sit in your house, and when you walk by the way, and when you lie down, and when you rise.” Deuteronomy 6:7 ESV
Today’s post is linked up with Tasty Tuesday.